
I may earn commission if you use my affiliate links to purchase products: More details.
I remember those days when I was a novice and used to Google these words; so if you’re reading this, I’m assuming that you just bought a domain and are now wondering what to do with it. Well, you’re in the right place.
Now it’s time to build a website; building a website or a blog is not as difficult as many of you may think. Even if you don’t have any technical skills, you can do it yourself without hiring anyone.
In this article, I’ll show you how you can build a fully-functional website within 20 minutes. Follow the steps below carefully, and your website will be ready within a few minutes.
Get a Web Hosting
So the first thing you have to do after buying the Domain name is to get a Web Hosting plan from a reliable company; most domain providers like GoDaddy and Namecheap also offer web hosting plans, but I don’t recommend them.
I recommend the following hosting providers; you can pick any one of them. However, Cloudways is my favorite, and I use it to build sites because they are one of the fastest affordable hosting providers available in the market for beginners.
S.N | Web Hosting Provider | Base Plan Pricing | Discount Link |
|---|---|---|---|
1 | ChemiCloud | $2.99/mo | |
2 | WPX Hosting | $24.99/mo | |
3 | Cloudways | $12/mo | |
4 | Rocket.net | $30/mo |
Install a Platform (WordPress)
After purchasing your hosting plan, you can install software or a platform that will help you build your website within minutes. There are content management platforms like Joomla, Drupal, etc. But WordPress is the best and most popular blogging platform that’ll help you design your site with ease.
Now, follow the steps below to install WordPress on your domain.
Since I use Cloudways to build my websites, below I’ll show you how to buy web hosting using Cloudways as an example. The steps are almost the same for other hosting companies.
With Cloudways, you will get a 3-day free trial without a credit card. So you can test it out without risk. You can also use the discount code to get 20% OFF for the first 3 months:
Let’s begin. . .
First, visit this page and click GET STARTED FREE.

Now, fill out your details below and sign up for an account. After logging in, you see a similar dashboard. Now click on LAUNCH NOW.

Now, you can see many hosting plans. I recommend Vultr High-Frequency servers, so you can go ahead and choose the 1GB or 2 GB RAM Vultr server as shown in the screenshot below.
You can also pick the server location of your choice. I suggest you with the nearest location to your targeted audience. For example, if your targeted audience is from Europe, you should pick locations like London or Amsterdam.

Once you click the LAUNCH NOW button, it will start the process, and your server will be ready within 15-20 minutes.


You will enter your server now. Now click on the WWW sign and then Your Application.

Once you’ve opened the Application Management, click on Domain Management, enter your domain name in the field, and click the “Save Changes” button. (Note: here I’m using my domain name: minimalistext.com as an example. You should enter your own registered domain name)
Link Domain with Web Hosting
Now you need to connect your domain name with the hosting server that you’ve just set up.
Log in to your domain registrar, mine is NameCheap, so I am showing it as an example.

Now copy your server public IP from Cloudways, and head over to NameCheap (or any other domain provider).
Add an A Record as shown in the example below.
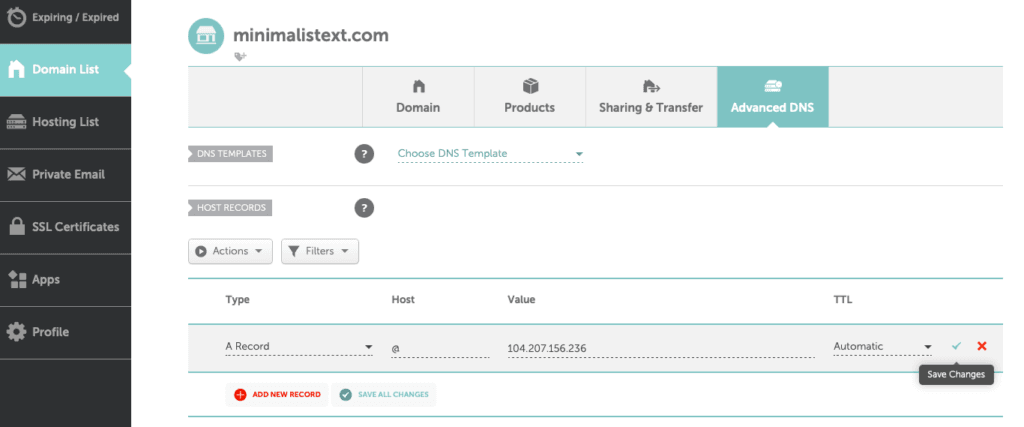
You should also add a CNAME record along with an A Record like this. (note: replace example domain with your domain)

Now you’re almost done setting up your Website/Blog. It might take some time for DNS to propagate.
Now head over to SSL Certificate on Application Management, and enter the field with your email and domain name. Then click Install Certificate.

It will take a few minutes, and you’ll get a notification saying SSL is installed.

That’s it! You’re done setting up your first website.
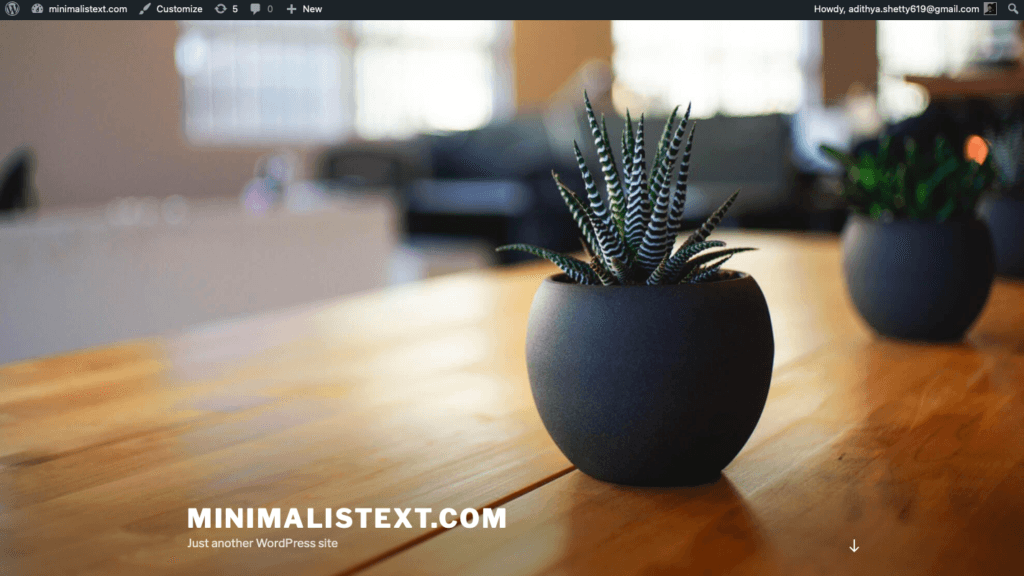
Now you can access your domain name through your browser. If it’s not loading, try clearing the browser cache or browsing through the private/incognito window.

Your WordPress website will look like this. Now, let’s log in to our website. You can find the login details in the Access Details tab in the Application Management. Refer to the screenshot below.

This is how your WordPress Website dashboard looks.

Let’s design (Add a Theme)
Let me show you how easy it is to change the design of your site. Click on Appearance, then Themes, and Add New.

Here you can browse through millions of free websites and blog themes.

Let me show you by activating a new theme. Click Install and then Activate. Voila, a new Design.
The best thing about WordPress is its ability to customize even for non-coders.
Above, I’ve shown what to do after buying a domain name. If you need any help regarding this, contact me here. I hope you found this guide helpful.
